Coconut Lamb Shanks
And how to salt, braise, and build like a champion living through end-times
Hello, earthlings!
I made one of my all time favorite, super easy, one-pot braised chicken dishes for some people I love last night and thought I’d share a build for a crowd pleasing, wallet gentle, generally delicious coconut braise to calm us all in these times of insane grocery prices and early-darkness evenings.


I thought I’d take the opportunity to touch on some concepts that I often have to explain to people I’m teaching how to cook - how to salt, how much to salt, how to sear and how to braise. If you already know all of that, scroll on, this recipe fucking rocks. If not, I hope this is helpful - armed with this knowledge you will soon know how to transform slightly more affordable cuts of meat into tender, bone escaping masterpieces that will make you a dinner party hero overnight. By the way, if we’re Instagram friends, I have made a new account and it’s @_garden0froses | I will not be receiving or responding to messages on my old one :)
There is one truly essential piece of kitchen equipment for this recipe, and that’s a cast iron dutch oven. If you don’t own one of these, I encourage you to reconsider as it is the single most important vessel in my kitchen. If you don’t have one and still really want to make this recipe, you will need a searing pan and a deep metal hotel pan with tinfoil. Just buy the pot. Target has recently released some super affordable ones through their in-house brand Figmint, and I know they’re often in the $50 - $60 range at TJ Maxx, etc. Just make sure the enamel is not chipped upon purchasing. Alright, let’s go over the big concepts here before diving into the recipe.
Salt.
Kosher salt. Coarse ground. Every time.
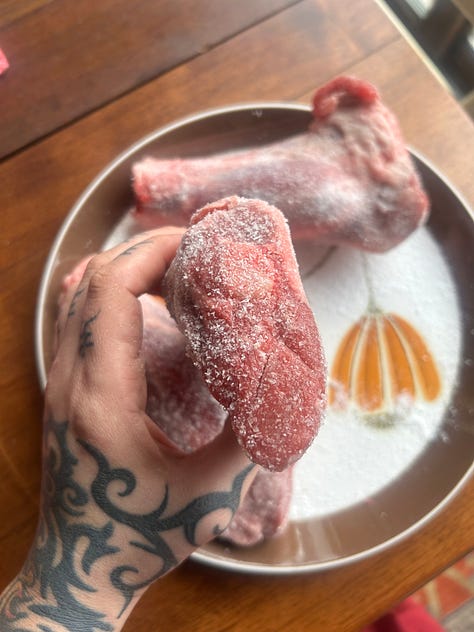
There’s a very simple way to salt something correctly, and it’s to weigh your protein, then select somewhere between 1% and 2% of that weight (in grams), and use that much salt to totally cover your meat. I have found my personal preference to be around 1.5% but you can start low and always add to taste.
In literally any instance of buying meat at a grocery store, you’ll have the weight printed directly on the package. You’re going to take the weight in pounds, multiply by 454 (454g in 1lb), and multiply that by 0.01 for 1%, 0.015 for 1.5%, etc. What you get is your weight in salt. For many of you, this will seem like a shit ton of salt. I would like to be the first one to welcome you to your new, correctly seasoned life.
meat weight in lbs x 454 = meat’s weight in grams
meat’s weight in grams x 0.01 = adequate salt’s weight in grams
When to salt: well, ideally, for multiple hours, but in a pinch, until your meat is very wet. You’re going to rub every crevice of your shank, short rib, or chicken thigh with your salt, and make sure that all the salt that falls off stays in whatever dish you’ve got it in, and sort of repeat until it’s all on there. If you have your shit together, do it the night before, but if you don’t, please, at least an hour.
Searing
To sear in an enameled cast iron, you must obey some rules.
Rule number one: never higher than medium heat.
Rule number two: never a hot, dry (no oil) pan.
Rule number three: always warm oil with warm pan.
Rule number four: always a rubber or wooden spatula.
That is to say, take your dutch oven, place on low heat, and as soon as the bottom is warm, aka, you can touch it without hurting yourself, add your oil. Then turn up to medium.
Whatever you’re searing, be it chicken thighs with skin, short ribs, a roast, whatever, the pan will release the meat when it’s ready. Do not try to outsmart the protein or the iron. You cannot. If you remove your meat too early, you risk leaving skin or tissue attached, and that is sad.
If you’re searing any of the above, remember that a good amount of fat is going to be rendered out of your protein. To avoid creating too much oil, I wouldn’t add more oil than just enough to cover the bottom.
*a note on deglazing - almost every braising recipe will call for some combination of searing - aromatics - deglazing. Unless you are extremely comfortable with your dutch oven, I would recommend removing it from the heat source the second you remove the proteins and before you add your onions, mirepoix, etc. This will stop you from burning your pan and the contents. If you have an electric stove, you can leave that burner on, or kick your gas off and back on an electric range. Also, any liquid works to deglaze. You do not need to use wine, or beer, or alcohol, unless you specifically want those flavors in your dish. I use lemon juice or something similar pretty much every time.
How to braise.
When I was learning how to cook, I was constantly frustrated that no recipes would note how much liquid to add to a pot when braising something in it. I may be the only person on earth to have ever wondered, but in case you have wondered to, let me help you. I like to cover what I’m braising about halfway with whatever my liquid is. I also make sure to flip over whatever I’ve got in my pot about halfway through the cook to even things out. This has never failed me, not in my home for myself nor in a restaurant for 100%. If you cover your meat completely, you’re entering stew territory which just isn’t what we’re looking for here. You will need a lid or tinfoil (or both, if your lid is wonky), to seal in moisture.
Okay, enough yapping. The recipe! This takes about three hours and feeds me three dinners and the ingredients (granted, I had bay leaves, allspice, and cardamom) ran me $27 at Whole Foods. If you’d like to keep this recipe at under $20, bone in chicken thighs should significantly lower the cost. I just love lamb. Of course, more and more can be added to the braising liquid - miso, soy sauce, fish sauce, veggies - but it’s beautiful just so, and if you can save yourself some purchases these days, you should.
2 - 3 lamb shanks (this amounted to about 2.25lbs, so if you want to substitute bone-in short ribs, bone-in chicken thighs, or oxtails, be my guest)
1 cup red lentils
1 can full fat coconut milk
2 mandarin or clementine or lime or whatever you already have before buying one
1 stalk lemongrass
1 inch or so nub of ginger
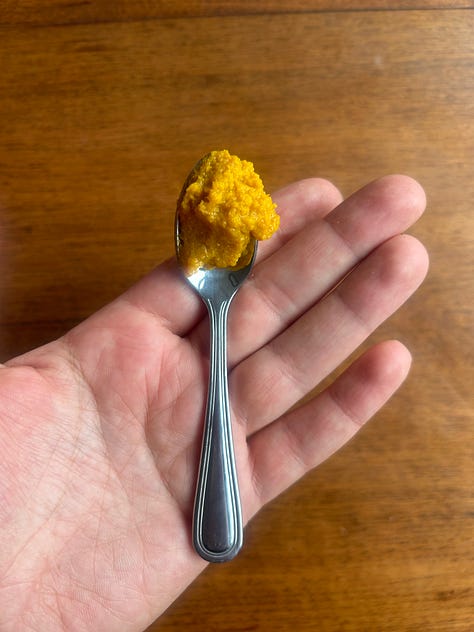
1 inch or so of turmeric or 2tsp turmeric paste
3 cloves garlic
10 bay leaves
1 tbsp whole allspice berries
1 tbsp whole cardamom pods, cracked
1/2 tbsp black pepper
If you want this to be spicy, add at your leisure, I’d go with fresh thai chiles or some gochujang
Salt your shanks and set aside, making sure to set out at room temperature thirty minutes prior to cooking.
Preheat your oven to 300. In the meantime, prep your garlic, ginger, fresh turmeric (if not using paste) and lemongrass. Mince garlic, turmeric, and ginger or grate them, whatever you’d like - no need to peel the ginger. We want a small particle size. Take our lemongrass stalk, cut off the wispy, empty top bits, then cut into three and smash with the heel of your knife handle (or a meat mallet, or something).
Halve your citrus and squeeze into a cup, getting as much juice out as possible.
When you’re ready to sear your shanks, bring your pot and a small, bottom-covering glug of olive oil to medium, then lay down your shanks. Allow to sear until chestnut-brown to walnut-brown, then flip and repeat.
Remove your pan from heat, pull out your shanks and set aside, then deglaze with your orange juice and scrape the burnt bits with your rubber spatula. With the pot still off the heat, add your ginger and garlic mince, stirring rapidly - we want to release the aromatics without burning the garlic. Keep stirring, then add your lemongrass.
Add your coconut milk, then return to medium heat. Add your turmeric paste, if using, and whatever spicy additions you may be making, then your spices. On the bay leaf - do not just use one bay leaf. Use a lot of bay leaves. They impart such beautiful flavor and we really underuse them.
Stir everything together, then lay your shanks down in the liquid. Fill your coconut milk can with water and add just enough to the pot to halfway cover the shanks. We have arrived. Cover your pot and place in the oven for 1 hour and 30 minutes, at which point we’ll flip and return to the oven for another hour.
At this point, pull out your pot and very gently remove your shanks. Add your lentils to the liquid and stir them around, making sure they’re totally covered in liquid. If they’re not, you can add just enough water from that coconut milk can to cover them. Place your lamb shanks on top, then return to the oven, lid off, for thirty minutes or until your lentils are done.
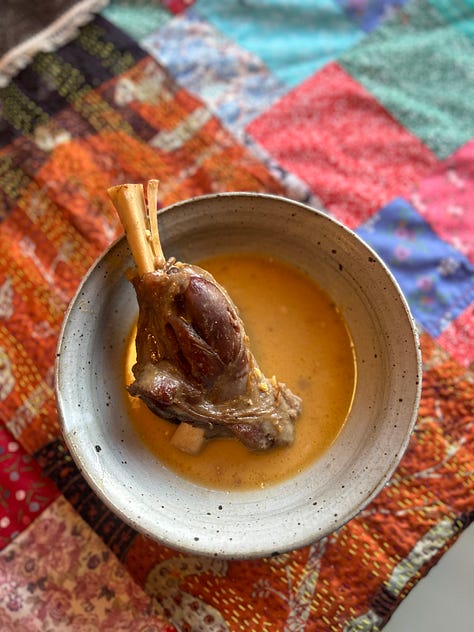
Once your lentils are done, you’re ready to rock - enjoy this flavorful, sweet, warming lamb and lentil bowl of heaven and pat yourself on the back. For storing, lamb is best taken off the shank and mixed in with remaining coconut liquid and lentils, but that’s just me.
Oh, and if you’re a real freak - suck the marrow out of the lamb bone. My dad used to do that and it drove my mama crazy.
In Health,
A


Made this today with Canada goose legs and it came out great
I made this the other day and it’s so amazing — thanks for this gift. Going to make again with chicken thighs tonight.